After you learn what goes into designing a new motor, you might want to consider modifying your machine first.

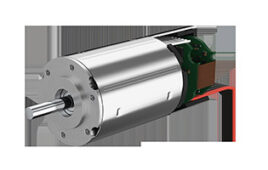
Empire Magnetics waterproof motors are specifically engineered to withstand frequent wetting or wash down, full submersion, and deep-sea applications.
When you need a prime mover for a new machine design, you typically have three choices: use a standard, off-the-shelf motor; modify an existing motor; or a design a new motor. Each approach has significant advantages and disadvantages that can affect its performance, lead-time, and cost, all of which are summarized in the table.

Unfortunately, the chances of finding an off-the-shelf motor that exactly meets your needs are pretty slim, especially at a low price. So, you might decide to either modify a standard motor, or modify (and maybe compromise) your machine’s design to accommodate an off-the-shelf unit.

The DP series abrasive dustproof motors resist contamination with an internal pressure to 15 psi and O-ring seals at potential penetration points. They also come with insulation for operation to 145° C. 
The HT series extended-temperature, unmodified motors typically operate from 0 to about +155° C; different lubrications may be required for 0 to -20° C; products are individually selected for -20 to -40°; and the CYVX series are intended for cryogenic products below -40 degrees C.
Option one: modify an existing motor
First, not many modifications can be made to an existing motor design. Some minor modifications such as mechanical changes to shafts can be done, but it’s not the motor itself that is ultimately modified, it’s the manufacturing process, which can be extremely expensive. For example, adapting a motor that was originally intended to be a low priced, standardized industrial product cannot technically or economically, be transformed into a waterproof, vacuum rated, radiation resistant, space rated, explosion proof, dustproof, cryogenic rated, or a motor able to produce more power in the same space.
However, before you decide to modify your machine design to handle an off-the-shelf motor, assume that you explore a custom motor design. To appreciate what goes into it, the
following describes each step in manufacturing a custom stepper or brushless motor. The specific process varies based on motor technology, the motor’s application, and specific manufacturing techniques. Some of the major cost includes the support electronics such as feedback control and systems integration in addition to the motor development itself.
Often, most customers do not have a sufficiently detailed specification at the beginning of the project that can be presented to a motor design engineer. As a result, the customer ends up consuming many man-hours of a highly trained engineer to get this specification work done. Normally, the customer will not place a value on the man-hours and the guidance of the knowledgeable person assisting him to develop a specification, yet this is the key to a successful project. Developing the detailed spec usually takes a few weeks and $2,500 to $5,000 of engineering man-hours. For example, the cost to review the design process, prototyping, documenting, testing, and manufacturing processes required involves applications engineers, mechanical engineers, magnetic designers, materials engineers, and CAD operators, all requiring hundreds of dollars per hour. These rates include support computers, software programs, and other professional tools to create typical burden rates for estimates.
Option two: design a custom motor
First, determine the specifications for the power output and the thermal capacity of the final application. The thermal limit is the basis upon which all other performance specifications are made, such as shape and environment. Next is the output power, torque, and speed, and finally, the mechanical envelope or arrangement. In some cases, a customer might be able to accept a “standard” motor configuration at this point. In other cases, however, it may require considerable mechanical design time to satisfy all of the requirements.
The mechanical design includes both the magnetic and thermal aspects of the package. The efficiency of the magnetic circuit directly affects the heat losses, the mechanical design constrains the magnetic design, and the thermal design constrains both the mechanical and magnetic design. This process typically goes through 3 to 5 cycles. A magnetic design can take 100 to 200 man-hours and typically cost $30,000. A fully optimized design with finite-element analysis adds another $20,000 to $40,000. Computer models can speed the design and improve the results, but the cost of the designers’ time and the cost of the equipment and software upgrades must be included.

Size 1 medical microstepped motors operate to 25,000 steps per revolution, weigh 0.2 lb, and have a 1.1-in. diameter intended for small spaces. They are specifically designed for mechanical manipulators in neurosurgery, and they can withstand several steam-cleaning cycles in an autoclave for sterilization.
A mechanical design emerges from the magnetic design for a set of motor laminations. This requires a metal stamping die at a cost of $30,000 to $60,000, depending on size, complexity, and quantity of laminations to be punched. High volume, fully automated die systems can exceed $250,000. By comparison, a small quantity of laminations can be cut using lasers or an electro-discharge machining (EDM) process, but this simply delays the tooling expense when additional units are to be produced.
Motor efficiency depends on the precise metal formulation used for magnetic components. In some cases, the same type of metal produced by different mills can produce significant operating differences in the motors. Also, heat treatments, annealing recipes, coatings, grain orientation, and assembly methods can affect motor operation and production costs.
Strips of steel used for laminations are slit to the proper width to fit the punching dies to minimize material waste. Different strip sizes are frequently required to provide rotor and stator laminations. The metal thickness affects both cost and performance. Generally, thinner laminations provide greater efficiency, but they cost more because more laminations are needed to build a specific stack length.
After the steel is cut, it is heat treated and annealed to get the desired magnetic properties. Typically, the entire coil of sheet material will be subjected to the heat treatments to save costs. However if the designer wishes to try different treatments, then several different lots may be needed to obtain the desired results, but at higher costs. To prevent the laminations from shorting together the surface of the metal is typically steam oxidized or otherwise treated to create an insulation layer on the metal, which incurs a setup charge.
Based on experience, a minimum quantity of new laminations for one stator lamination and two version of the rotor lamination cost about $3000 to $5000, and can vary with motor size and material.
In practice, a modest amount of modeling can speed things, which is often the most cost effective thing to do, and then build units based on estimates. The investment in modeling is typically driven by the quantity of motors that will be produced and the time allotted for production. The greater the investment in optimization, the lower the per-unit cost in production. But, cost savings will be realized only if the volume of production is great enough to amortize the optimization costs. Typical design cost using existing laminations and estimating are $10,000 to 30,000, full optimization can exceed $100 K. A combination of the two will typically be in the $20,000 to 40,000 range, with the product cost typically falling into the middle of the range.

High-energy gamma radiation attacks all materials; however, the non-metallic materials in motors are subject to more rapid breakdown. Lubricants, varnish, adhesives, insulations, and cables deteriorate and ultimately crumble. RH series radiation-hardened products combine the best available radiation resistant materials with practical commercial practices to provide products with the longest possible service life.
After a lamination is selected, the metal, heat treatment, metal thickness, insulation layer, and assembly method for the stator stack must be determined. Thin laminations make a more efficient design, but are more difficult to stack and require more laminations per motor. The assembly method greatly influences the unit cost and durability of the motor.
Hand stacking is quite expensive, but avoids the cost of automated stacking machines and tooling. However, even hand stacking requires alignment fixtures, and usually frustrates the customer who is trying to minimize cost on a single motor.
The rotor may need two or three alignment fixtures. The shaft is machined to size, the laminations are stacked, and then the magnets are ground to size and bonded to the shaft and lamination. Finally, the bearing journals and the outside diameter of the rotors are ground and may need balancing for high-speed operation. Each step requires a set-up charge or minimum quantity purchase.
After the stator laminations are stacked, the coil slots are insulated by dipping or coating, by hand or machine. Hand inserting the slot liner is the most common method for a few pieces, but expensive. Machine insertion reduces cost, but winding inserts must be tooled. Coating methods are typically used only when volumes are large enough to justify the equipment and overhead costs. Special coatings can also incur environmental protection costs to prevent toxic materials from escaping. Unfortunately, some of the better insulation materials are so toxic they are banned in the U.S.
After the slot liners are installed, the coils are wound and installed. For a few pieces, coil forms are typically made, and then the coils are hand wound and hand inserted. For somewhat larger batches, the coils are machine wound and hand inserted. For higher volumes, the stators are machine wound, which requires custom coil forms be inserted directly into the motor. Machine winding is typically used for higher volume production, which can cost as much as $70,000. Finally, the coils are impregnated to hold them into place.
Next, the stator may be ground to fit a housing. The housing may have mechanical alignment features for the stator or require an assembly fixture and tooling. The stator may be glued into the housing and cured, or it may be pinned, welded, or otherwise fastened in place.
Two end bells have to be fabricated. They must align the bearings on center, mount to the housings, hold the bearings, and provide mounting features. These parts are complex and include tight tolerances. Typically, three to five different machine operations make these parts with a set up cost. In higher volumes, the end plates are typically castings.
After the stators are installed in the housings, either the stator’s inside diameter locates the grinding operation, or the housing is ground and the inside diameter of the stator is ground to be concentric with the housing. Once the machine work is completed on the stator housing, the lead wires from the motor coils are hand soldered to a cable or to a connector. Next, the motor can be tested for inductance, resistance, and high-potential break down.
The bearings are installed on the rotor shaft, and the preload wave springs and retainer springs are inserted. The motor is then assembled and the end bells are mechanically attached to the motor housing. The motor is then connected to a drive and tested for function. Static torque can be checked and dynamic torque-speed curves may be developed on the motor. Torque-speed curves require special measurement equipment. A reasonably equipped motor testing lab will contain as much as $250,000 worth of equipment. Furthermore, the motor’s operation highly depends upon the electronics that drive the motor. Some drives are 10% efficient, while others are 85%. Radically different outputs can be obtained from the same motor, depending on the supplier and the design. The cost of the drives and the time it takes to do the testing are additional costs that have to be considered.

These motors withstand space-related environments, which include vacuum (10-8 to 10-12 torr), deep space cryogenic (20° Kelvin), thermal shock (sun at +200°C to shade at -200°C in one to two seconds), launch vibration, ionized particles, and radiation.
However, even after the motor is made and shipped, the job is still not done. Customers typically require documentation and initial start-up support. Later, if any type of problem crops up, the motor is the first thing to be suspected because it is “special.” Also, the motor manufacturer frequently has to support system debugging simply because the suppliers of “standard” motor controllers do not offer support after the sale.
Finally, at some point, the customer may need repairs and spare parts. Five to seven years after the sale, the purchaser of custom motors expects a higher level of support than that which comes with a mass-produced motor. Yet the economic base to pay for such support does not exist. The customer that chooses to use custom motors must be prepared to procure and hold spares in inventory or risk having his machine down for a long time.
Option three: modify your machine. Now, if all this is more than you bargained for in a custom motor design, then you have to look at that third alternative. Either modify your machine if you started the design before selecting the prime mover and live with the compromises or best of all, pick an off-the-shelf unit to begin with.
Empire Magnetics, Inc.
www.empiremagnetics.com
::Design World::
Filed Under: Motion control • motor controls, Motors • ac, Motors • dc, Motors • stepper
Tell Us What You Think!