RavenWorks in Maple Grove, MN, is known for its automotive machining and testing business. Its employees, who are hot-rod enthusiasts, saw a need in the market for replacement parts for vintage vehicles. They decided to carefully select and manufacture “extinct” parts for which there was a large demand among the hot-rod restoration community.

For hot-rod enthusiasts, many replacement parts are not readily available. If they are found, they may be so worn that their function is questionable, or they are expensive. RavenWorks engineers decided to reverse engineer the parts they needed in their rebuilding work to ensure their quality.
Many replacement parts are not readily available to restore unique and vintage vehicles. These difficult-to-find parts may be expensive, and even if they can be found, they may be worn so much that their function comes into question. RavenWorks engineers decided to reverse engineer the parts they needed in their rebuilding work to ensure their quality. Once the new parts are made, they then need to inspect them to make sure they are geometrically correct and physically sound.
A vendor referral led the engineers to Laser Design, Inc. and its 3D laser scanners. Non-contact 3D laser scanning is ideal for both reverse engineering and inspection. A complete measurement method, 3D laser scanning captures everything on the surface of an object, including free-form shapes and fine details so they can be accurately re-created and verified. And, because it is a non-contact measuring method, it allows consistent capture of part geometry by removing the human error factor.
RavenWorks purchased and installed a Laser Design SURVEYOR™ WS-3040 3D dual-purpose scanning system with dual lasers, the SLP-250 for smaller parts and SLP-500 for mid-size to large parts.
The fully automated, CNC programmable Surveyor system delivers an accuracy of 0.011 mm and resolution of 0.005 mm. The system includes a Renishaw PH-10 (CNC head indexer) and a 4th axis rotary stage for flexible 6-axis 3D scanning. The dual system technology is capable of using a CMM touch probe as well for accuracies of up to 0.0025 mm.
Laser scanning technology works by projecting a line of laser light onto a surface while cameras continuously triangulate the changing distance and profile of the laser line as it sweeps along. The laser line passes back and forth over the area until the complete surface is captured. Irregular shapes are measured just as easily as prismatic ones, and they are instantaneously replicated digitally on-screen.
The scanner measures quickly, picking up tens of thousands of points per second, and generates huge numbers of data coordinates in a point cloud. If the object is large, several scans are made to capture the entire part and then the point cloud data files are rotated into the same reference frame and assembled into an exact 360-degree 3D model of the scanned part.
One of the first projects the engineers performed with the 3D laser scanning system was scanning the transmission shaft of a Ferrari for reverse engineering. A tooth was broken on a gear of the shaft and a suitable replacement part “was impossible to find,” according to the engineer in charge. By scanning the broken shaft, they were quickly able to recreate the missing geometry and model the virtually “repaired” part. The CAD model was then fed directly into their CNC machine to produce the new part exactly. The ability to machine hard-to-find parts speeds up restoration processes by keeping it in-house and by removing the search and shipping activities from the turnaround time.
The scan data of the transmission shaft worked seamlessly with the CNC to create a useable, accurate part, which was eventually used in the Ferrari restoration.
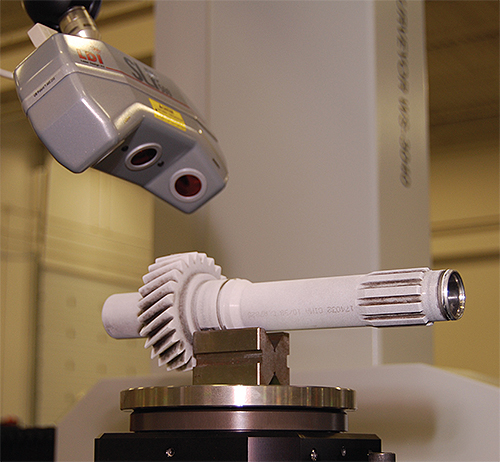
To replace a transmission shaft of a Ferrari, RavenWorks engineers used a 3D laser scanning system from Laser Design, Inc. and GKS Global Services. A tooth was broken on a gear of the shaft and a suitable replacement part was impossible to find. By scanning the broken shaft, they were quickly able to recreate the missing geometry, model the virtually “repaired” part, and machine it.
RavenWorks has also scanned several other types of parts for individual production or short production runs such as valves for engines, which have certain angles into the seat on the engine head; the scan data precisely record the angle from the valve, and from that, a tool is made to match up the components. Plans are in the works to create a valve stem library of scan data so that the CAD models can be reused, saving more of RavenWorks engineering time and resources.
The in-house SURVEYOR WS system will also eventually be used to inspect the company’s hand-made and machine-fabricated prototype parts with the 3D CAD models generated from the scan data. The ability to easily duplicate precision hand-crafted and performance parts with high accuracy for testing, replacement, and advanced design, plus inspect their product all with the high-accuracy high-speed Laser Design scanning system will save the company tremendous amounts of time and money. With 3D CAD models made directly from the physical parts, the labor-intensive trial-and-error process of product development is no longer needed to deliver enhanced performance replacement parts to their hot rod and vintage vehicle restoration customers.
Laser Design, Inc. and GKS Global Services
www.laserdesign.com
RavenWorks
www.ravenworksllc.com
::Design World::
Filed Under: Software • 3D CAD, Digital manufacturing, Automotive, ENGINEERING SOFTWARE





Tell Us What You Think!