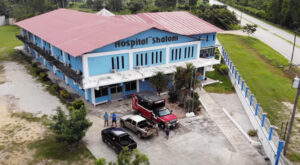
Hospital Shalom is the only facility that provides prosthetics care to patients of the Petén region in northern Guatemala.
LifeNabled volunteers and designers created a fully digital workflow to produce custom 3D printed prosthetic sockets with flexible inner liners. Now, 35 patients in the jungle of Guatemala are walking on the world’s most advanced prosthetic and orthotic devices. Funded by donors and sponsors, the team has been treating patients in the poorest regions of Guatemala for the past 15 years with free, bi-annual clinics. Using traditional fabrication methods in a limited time frame required hard work.
In their last clinic, the team cut the cord on traditional fabrication and did everything digitally. Using patient scan data as input, they automatically generated the prosthetic socket designs in nTopology, and 3D printed them in durable TPU with HP’s MJF.
The new digital workflow saved the team more than three days of laborious work. The process can be replicated in other parts of the world to significantly improve the quality of life of amputees in developing countries.
Brent Wright is a Certified Prosthetist and Orthotist. Together with his wife, Meredith Wright, they co-founded LifeNabled, a non-profit provider of prosthetic solutions for the developing world, based in Raleigh, North Carolina, USA. Brent and his team are changing the lives of amputees in northern Guatemala who do not have the means to afford prosthetic care. Their bi-yearly clinics have treated hundreds of patients over the past 15 years.
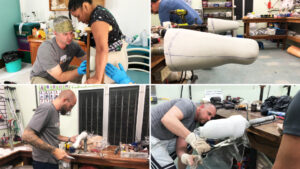
Manual fabrication of prostheses is a time-consuming, expertise-intensive, and laborious process.
However, fabricating prostheses is a highly technical job. Evaluating, manufacturing, and fitting prostheses to the 30-50 patients during the week-long clinics took a physical toll on Brent and his team of volunteers.
For their latest clinic, Brent and his team applied their years of experience in prostheses fabrication and additive manufacturing to develop a fully digital workflow. In this case study, we walk you through the steps they followed — from 3D scanning to design and manufacture — to create custom, 3D printed prosthetic sockets based on patient data in a cost-effective manner.
Traditional Vs. Digital Fabrication of Prostheses
Traditional fabrication of prostheses is a laborious process. Since each socket needs to offer a custom-made fit for each patient, the fabrication is entirely manual. Typically, there are three steps involved in the process. First, the Prosthetist takes a cast of the amputee’s missing extremity during patient evaluation. Then, they use the cast to create a custom mold to thermoform the socket; the socket is connected to off-the-shelf components to manufacture the prosthesis. Finally, the Prosthetist fits the prosthetic device to the patient and makes the necessary adjustments to ensure a good fit. Manual fabrication of prostheses is a time-consuming, expertise-intensive, and laborious process.
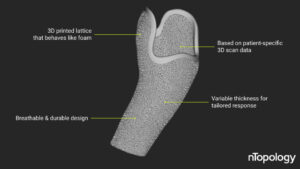
The final design of one of the 30+ custom-made flexible inner linings — designed in nTopology.
Brent Wright’s vision is to fully digitize the design and manufacturing steps. These steps are the most expertise-demanding phases of the prostheses fabrication process. At the same time, his team can train locals (or guide them through video calls) to perform the evaluation and fitting steps, eliminating the need for an expert to be present in the remote location.
As a proof of concept, the team cut the cord to traditional manufacturing in the last clinic and followed a fully digital process. By digitizing the entire workflow, they could make the process scalable and as cost-effective. Here’s an overview of the new digital workflow:
• First, two team members flew to Guatemala to take 3D scans. In just two days, they were able to evaluate 35 amputees.
• Then, over the next two weeks, Brent designed and customized each device and manufactured the sockets using HP’s MJF 3D printing technology.
• Finally, the team returned to Guatemala a month later to deliver the devices and fit them to the patients.
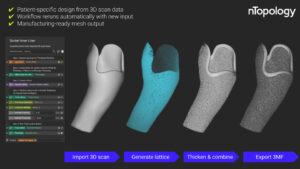
Overview of the design process in nTopology — from importing a 3D scan mesh to exporting a manufacturing-ready 3MF mesh file.
Flexible 3D Printed Inner Liners
The inner liner is an essential part of the prosthesis, and the socket must be comfortable for the wearer while working or during prolonged hours of use. Moreover, it must be breathable to ensure good hygiene. “We need to make sure that the prosthesis breathes, especially in the jungles of Guatemala,” said Wright.
However, traditional gel-like inner liners are not very breathable, cost more than $160, and have a limited life span of only 3 to 6 months in the tropical climates of Guatemala. This cost is prohibitively expensive. Brent’s team wanted to replace the costly liners with knitted socks. Socks are very affordable, breathable, easily customizable, and washable. To ensure comfort, the team turned to 3D-printed foams to design a flexible inner socket liner.
3D-printed foams are flexible lattice structures that imitate the properties of traditional foams. They are manufactured from an elastic material like TPU and offer additional benefits over conventional foams.
For example, their properties can be tuned (from soft foam to stiff plastic) according to the physiology or preferences of the patient. This effect can be achieved by closely controlling the design input parameters of the lattice, such as beam thickness and porosity, using advanced engineering design software like nTopology.
From 3D Scan to Manufacturing
Even after the team has determined the 3D printed foam design parameters to achieve the desired cushioning, applying it to 30+ custom socket designs would be a challenge. Without nTopology, this step would be a “brutal process,” according to Wright. The legacy software he was using before nTopology would often crush or take hours to generate a result.
“Designing custom flexible inner liners was going to be a challenging task if we would do it in any other software other than nTopology. Once the workflow was done, all I had to do was to swap out meshes. The process ran over and over again,” said Brent Wright.
The workflow is semi-automated and straightforward to implement. Here’s the overview:
• Using the mesh of the patient’s 3D scan data as input, they first generated a shell with variable thickness.
• They then used nTopology’s latticing blocks to create a flexible inner liner that provided the necessary level of cushioning.
• To repeat the process and generate a new design, they only had to swap in a new input mesh with 3D scan data from another patient.
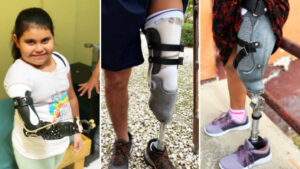
Three of the 30+ patients fitted with their new 3D printed prosthetic devices.
With nTopology’s reusable workflows, the team saved more than a whole day of error-prone computational processing during the design phase and produced higher-quality and error-free results.
For manufacturing, the team opted for HP’s Multi Jet Fusion 3D printing process in TPU. This process and material combination is excellent for manufacturing flexible lattice structures with variable thickness for padding. TPU is also very durable, making it a good option for the jungle of Guatemala. This digital process saved the team 2-3 days of fabrication and replaced a laborious manual step with streamlined digital manufacturing.
Wright’s goal is to create a global network of prosthetic device providers for the developing world. With digital manufacturing and engineering design tools like nTopology, this dream is achievable. There are multiple industrial-grade 3D printing systems located worldwide (even in developing countries) that could be leveraged to manufacture the needed prosthetic devices. Local physicians can be trained through video calls to evaluate the patient and fit the prostheses. As for the design of the device, this can be generated using the automated processes that Wright’s team has developed.
LifeNabled
lifenabled.org
Filed Under: ENGINEERING SOFTWARE

