By Michael Hoffman, of Dragos and the SANS Technology Institute

Figure 1: To demonstrate how a student PLC kit using AutomationDirect PLC and HMI components can be used to build an automation solution, the author used this setup to control a coffee bean roaster.
Those already working in the industrial automation space are aware of the advances over recent years with controllers, communications, and other technologies used for projects of all sizes. Whether the automation task is a single machine or a factory, there are many options for creating practical, robust, and secure automation solutions.
My years of industry experience, and my involvement with the SANS Technology Institute, have highlighted that smaller home automation do-it-yourself (DIY) type projects are a great way to learn how to design, build, program, and protect industrial automation systems.
SANS provides training, certifications, scholarship academies, degree programs, cyber ranges, and resources — and it also offers courses relevant to manufacturing operational technology (OT) users. For example, the ICS612 course provides students with a programmable logic controller (PLC) and accessories, encouraging them to tackle small automation projects after class.
As an example, I repurposed a student PLC kit from ICS612 to automate a home coffee roaster. This article describes my approach and how others can do the same.
Think Big but Start Small
So, what can be automated as a DIY project? Almost any electro/mechanical system with variables that can be measured and devices that can be controlled. The real question is, can a DIY automation project bring value in the form of:
• Better control.
• Remote visibility.
• Energy savings.
• Or simply improving one’s skills and knowledge.

Figure 2: This coffee roaster project uses a variety of products such as a CLICK PLC, C-more HMI, Rhino power supply, and other components available from the AutomationDirect.com website.
Small projects can be inexpensive to implement yet provide useful functionality and valuable lessons. Some excellent examples of things in and around the home that can be controlled and automated include lights, ovens, BBQs, smokers, yard/garden sprinkler systems, water heaters, power distribution, small appliances, and more (Figure 1).
At SANS, students use PLC kits consisting of an AutomationDirect CLICK PLC, I/O cards, and HMI, along with an associated virtual machine (VM) loaded with the free configuration software. This is a solid platform with many connectivity options, and it is well-suited for class projects and industrial automation solutions ranging from simple to complex.
In the spirit of education, I embarked on a project to automate a coffee bean roaster using these industrial-grade components. The following is a description of how I proceeded.
Coordinating Caffeine Creation
Smaller-scale DIY automation projects share many elements with large-scale industrial projects, and for best success, should address typical project management practices. A plan or scope should be developed with a realistic budget and schedule. Of course, any plan is subject to refinement along the way. Once underway, some basic project steps include:
• Design (with security in mind at each step)
• Build
• Program
• Secure
There are other more detailed steps, such as documenting, communicating, and testing. Testing is quite crucial at every stage to ensure proper and safe functionality. Notice that the final step in the list above is ‘secure.’ Because many automation projects may be connected to a home network or the internet, it is critical to ensure steps are taken to secure any system against malicious activity.
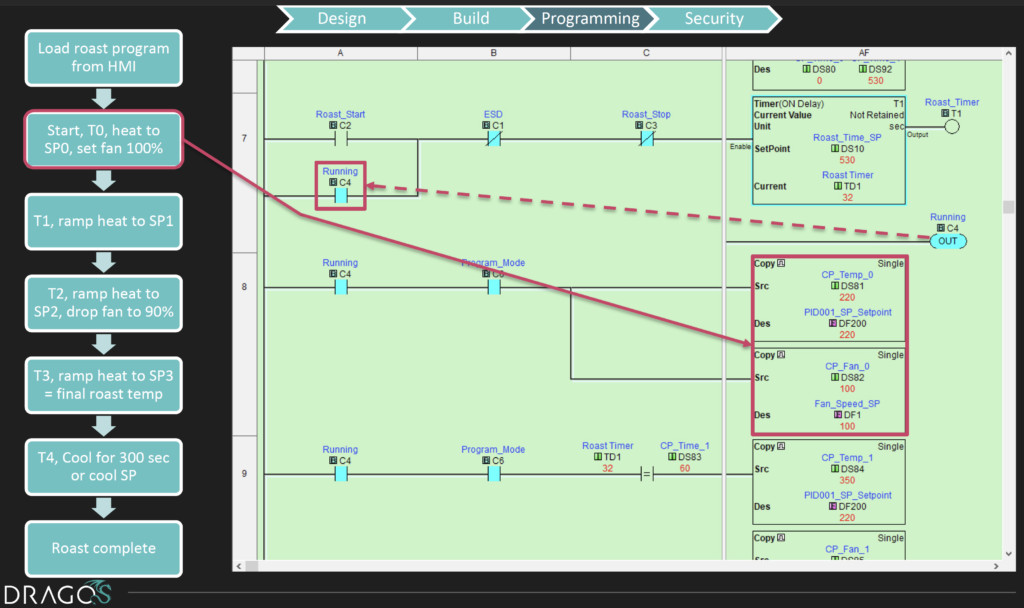
Figure 3: PLC logic handled the five-step coffee roasting process, and the HMI was used to load settings, issue a start command, and monitor the operation.
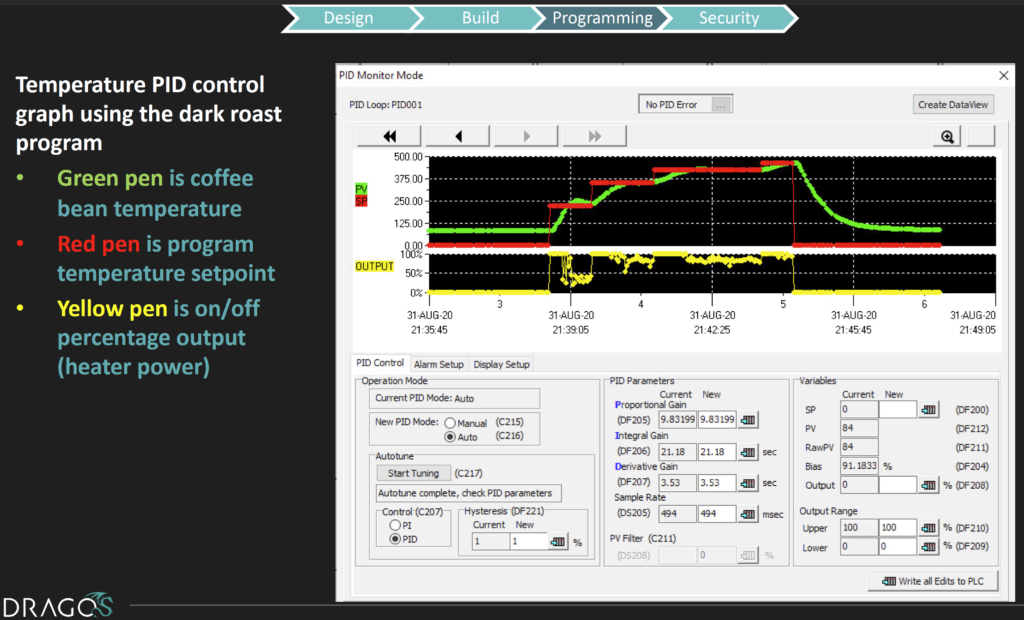
Figure 4: The CLICK PLC includes standard PID control loop functionality, which was used to turn the heater on and off as needed to maintain the desired temperature.
Beyond the fact that I like freshly roasted coffee beans, the activity of automating a coffee roaster is a good example project because the parts don’t cost much, and the required automation is not overly complex. However, it is possible to improve the basic functionality and add other advanced capabilities like data logging and remote connectivity.
One other note is that DIY automation projects sometimes require a little creativity due to budget constraints. The shrewd DIY-er may find low-cost parts on eBay or perhaps used equipment no longer needed by an employer to make the task more feasible.
The following steps happen in a mostly sequential manner, but there are times when iteration and rework are required. This is especially true as the process is learned and available technologies are applied to implement the automation.
Design
The first step is understanding the workings of the equipment to be automated. In addition, the capabilities of automation components and how they can be applied must be considered. For this example, coffee beans are roasted using heat and air. Here are the typical stages for a medium roast:
• Drying cycle: At around 220°F to prep the beans.
• “First crack” Maillard: At around 420°F where body & sweetness are developed, and the beans are lightly browned.
• “Second crack” caramelization/development: At around 460°F where acids are degraded, and the beans turn a dark brown.
• Cooling: Temperature is quickly lowered to 80 °F to prevent over-roasting.
Temperature, time, and airflow at each stage are set to define a profile, and various profiles produce different flavors. The code for this project was planned to encompass pre-set profiles for light, medium, and dark roasts, along with the capability to create a user-defined manual roast profile.
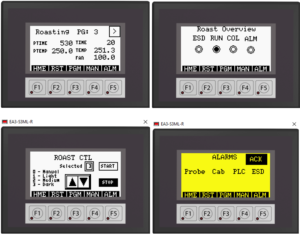
Figure 5: The local C-more Micro HMI was configured so the user could easily visualize the system operation and status, as well as make any needed setting and control changes.
Build
After some research, a Fresh Roast SR540 appliance was found to have the suitable characteristics, with the feasibility to remove the factory controls and supersede them with an AC solid-state relay for the heater and a DC drive for the fan speed. A thermocouple was added to measure temperature, and all these devices were connected to PLC I/O using wiring and terminal blocks. While some may have found it hard to tear apart a working appliance to do a project like this, in many other cases, these types of projects can be created from used parts. Safety is a top priority, so in this case, all devices like the PLC, power supply, relays, and more are installed in an enclosure and fuse protected (Figure 2).
Program
Based on an understanding of the coffee roasting process, how the roaster works, the PLC and HMI capabilities, and the desired user functionality, it was time to develop the program. The PLC would execute five steps, and users would configure setpoints, a start command, and monitor the operation using the HMI.
• Step 1: Start and heat to setpoint 0 (SP0) with the fan at 100% (Figure 3).
• Step 2: Ramp heat to SP1 for drying.
• Step 3: Ramp heat to SP2 and slow fan to 90% for ‘first crack’ (Maillard).
• Step 4: Ramp heat to SP3 for “second crack” (final roast).
• Step 5: Cool for 300 seconds or until a cool SP is reached.
• Whenever heating was needed in any step, PID controls (with time proportioned on/off heater output) would be used to control the temperature at SP (Figure 4). The PLC monitor mode was used to tune the PID loop, and the PLC’s real-time control functionality was then used to monitor the setpoint and actual process variable temperatures as the roasting process proceeded. This information was graphed and displayed on the C-more Micro HMI. For general operation, several local HMI screens were developed to indicate the running status, set the profile mode (and any associated setpoints), and indicate alarms (Figure 5).
Protect
For a truly standalone system, it would be tempting to end the development right after the programming was tested. If only a PLC and local HMI is used, the system could effectively act as an ‘island of automation’ and be less susceptible to outside attacks. However, most modern automation systems include network connectivity, and many users desire remote access, so it is always necessary to consider the cybersecurity aspect.
In this case, a Raspberry PI v4 was configured as a router and a wireless network bridge, in conjunction with a Moxa firewall, and connected into an architecture with considerations for security monitoring (Figure 6). The firewall enabled a secure remote connection between the engineering workstation (a Windows 10 VM with the CLICK PLC programming software installed) and the remote PLC. The firewall rules were configured to restrict connectivity between the VM and PLC over the configuration UDP port. Because coffee roasting can produce a fair amount of smoke, the PLC was located in the garage. Therefore, having secure remote connectivity was a significant advantage for colder months.

Figure 6: This simplified network architecture depicts how a DIY PLC project can be connected to a network for providing convenient yet secure remote access.
The firewall also could restrict Modbus communications to the CLICK PLC down to the protocol function level for data reads and writes, ready to support a future remote HMI. The Raspberry PI was also set up with an additional Ethernet interface to monitor the PLC and external systems’ traffic. This allowed a future project to continuously capture network traffic via tcpdump and send those packet captures to Zeek or the Dragos community tool, Sophia, for network security monitoring.
Grande results from a short investment
Like the coffee roaster system described in this article, DIY automation projects are a great way to learn technical skills. As a microcosm of much larger industrial automation projects, developing a DIY system shows the importance of following sound project management, design, build, and programming practices. Commercially available PLC and HMI platforms provide an excellent foundation, and they enable users to explore even more advanced topics like remote connectivity and cybersecurity.
Dragos
dragos.com
Filed Under: PLCs + PACs