By TJ Konieczke, Manufacturing Controls Engineer, Maclean Vehicle Systems, Royal Oak, Mich.
While eddy current sensors are a common inspection choice, they were ill suited to this fastener inspection application; critical details were missed. Vision systems, with their ability to collect a lot of data, delivered the needed accuracy.
Automotive wheel fasteners must be inspected to verify the nuts are properly threaded. A good part is threaded on the inside diameter while a bad part is not; the inside is smooth. The fasteners consist of either two or three parts; a nut and a stainless steel cap – or a nut, cap and washer. They are assembled on an index machine that processes two parts simultaneously at a speed of 31 cycles per minute.

Maclean Vehicle Systems ships more than one billion cold formed automotive fasteners a year. To meet demanding quality requirements, the company’s manufacturing engineers installed a Cognex Checker 101 vision sensor.
One well-known method of inspection is an eddy current sensor, but it often rejects good parts because its accuracy does not always match its needs. A vision sensor can locate the nut bore and look for bright reflections from the threads to identify good parts.
When the new vision sensor was installed, it paid for itself in a short time by passing the good parts and eliminating the bad ones with much higher accuracy. The vision sensor has not passed a single bad part either in production or in frequent challenge tests under normal operating conditions. Recently, the application was upgraded to a Cognex Checker 3G vision sensor that lets operators see each inspected part on a screen.
Blind eddy current sensors
Traditionally, eddy current sensor technology has been the accepted state-of-the-art method for this application. It runs an alternating current through a sensing coil to create an alternating magnetic field that induces small currents in the target. The eddy currents create an opposing magnetic field that resists the field generated by the probe coil. The electronics sense the change in the field interaction and produce a voltage output proportional to the distance between the probe and target. When threads are present, the distance from the sensor to the target is higher than when the threads are missing, and the output voltage increases.

The challenge in inspection was finding a sensor that could detect the small differences in distance between a threaded and an unthreaded part. A good part is threaded on the inside diameter while a bad part is not; the inside is smooth. The Cognex Checker inspection engine was able to determine what a good part should look like and compare as many different features as necessary to make the pass or fail decision with certainty.
The challenge in using an eddy current sensor on this application was the difficulty in detecting the small differences in distance between a threaded and an unthreaded part. So the eddy current sensor had to be set to a very high level of sensitivity to ensure that it did not pass any unthreaded parts. This setting had the unintended consequence of rejecting a significant number of good parts. The percentage of false positives was not high in normal operation, but even a 0.5% false positive rate in a day’s production run of 80,000 parts amounted to 400 rejected parts. The eddy current sensor also frequently drifted out of adjustment. If it drifted out when it was not being monitored, such as during the night shift when relatively few operators were in the plant, the machine could easily generate tens of thousands of rejects.
The move to vision sensors
Because of the high rejection rate of good parts using eddy current sensors, it was essential to identify and implement a new inspection device that would reduce the need for manual sorting. Other inspection methods were considered, such as retro-reflective sensors and photodiode sensors, but these methods also had difficulty clearly distinguishing between good and bad parts.
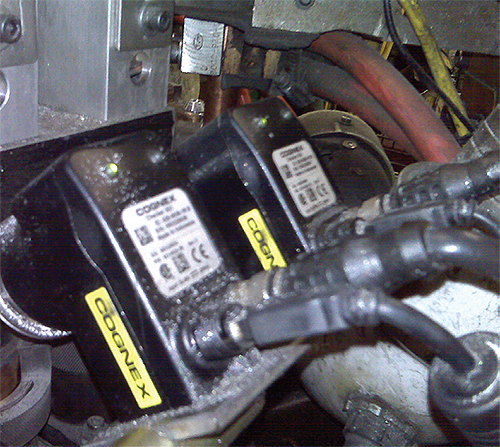
The vision sensor is set up to interface with the programmable logic controller (PLC) that operates the assembly machine via a 12-pin serial cable.
The company has used machine vision systems for inspection in manufacturing and assembly operations for over a decade. But the older vision systems required considerable expertise to set up and were somewhat unstable, so they required a substantial amount of engineering support to keep them running. Moreover, the older model vision systems were programmed using the C or C++ programming language, which often required the services of an outside consulting firm. And, they also needed skilled on-site technical expertise to keep them operating properly. For example, a slight change in the color of the plating used on a fastener might cause them to suddenly begin rejecting good parts. These considerations discouraged the company from selecting machine vision in the past for this particular wheel fastener application.
However, over the last few years, a new generation of vision systems has been developed that made machine vision the inspection technology of choice for a broader range of applications. Machine vision, more than other inspection technologies, can capture a large amount of data, which can be used to discern more differences between good and bad parts. In addition, these systems are easier to operate with point-and-click interfaces.
The Cognex Checker inspection engine can “understand” what a good part should look like and can compare as many different features as are needed to make the pass or fail decision with certainty. Like a traditional sensor, it is also compact, self-contained, and rugged so that it can withstand tough factory conditions.

The Cognex Checker vision sensor locates the nut bore and looks for bright reflections from the threads to identify good parts. These screen shots show the Checker 101 and 200 series software screen shots.

Developing the vision sensor application
Two Cognex Checker 101 vision sensors look down at a 45 degree angle, about five inches from the two parts in the inspection station of the assembly machine. The parts are presented to the inspection station in a fixture and held in position by a spring-loaded keeper, so they can be positioned and adjusted to various heights.
The vision sensor was set up through software, dragging and dropping inspection tools onto the features that needed closer scrutiny. First, the variable placement of the part was addressed by using an edge-finder tool to locate the edge of the part. Then a brightness tool was installed to detect the light reflected from the threads.
Then the vision sensor was set up to interface with the programmable logic controller (PLC) that operates the assembly machine. The vision sensor was connected to the Rockwell PCL-5 PLC with a 12-pin serial cable. The PLC provides a static output that indicates when a fixture is in position with two new parts. When the vision sensor receives this signal it captures an image and inspects the part. The vision sensor then sends an output to the PLC indicating that the part is either good or bad. Based on the inspection results, the PLC determines whether to send the part to the pass or fail bin.
The company recently upgraded the application to the Cognex Checker 3G vision sensor because it can be used with the Cognex SensorView Teach Pendant Display Panel. Operators can see at a glance if dirt or dust is on the sensor lens or if the lens is moving out of alignment. This monitoring increases the level of certainty of the inspection results. The Checker 3G also provides 7852 x 480 resolution which increases inspection accuracy, and the SensorView Teach Pendant can be used by operators to set up new vision applications without requiring a PC.
The ability of the vision sensor to determine the position of the part and evaluate the brightness of the entire opening of the nut as opposed to an individual point evaluated by a traditional sensor has eliminated incorrect pass and fail decisions. Manual sorting was eliminated, and those cost savings quickly paid for the new vision sensor. The vision sensor has also increased confidence that not a single bad part will be shipped to the customer.
Maclean Vehicle Systems
www.mfmvs.com
Cognex
www.cognex.com
::Design World::
Filed Under: Automotive, SENSORS, TEST & MEASUREMENT, ELECTRONICS • ELECTRICAL, Vision • machine vision • cameras + lenses • frame grabbers • optical filters


Tell Us What You Think!