Manual inspection of treads on parts is inefficient and often inaccurate. Recently, the Van Wert, Ohio division of Eaton Corp., had a project that required 100% inspection, forcing the Eaton team to consider their options. The end product was a hose assembly with end fittings. Standard operation meant that quality inspection personnel would have to bring every unit through the QC area, but that was impractical. Another option was to train production workers to perform the operation on the floor, but that was not practical either. To maintain the desired production rate, additional workers would have to be employed on the line.

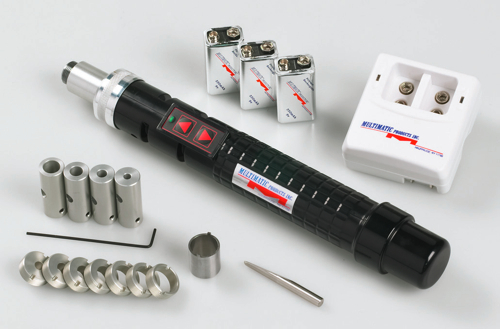
The Rotary Thread Inspection Tool Kit comes with taper lock extensions for gauge tapers 0, 1, 2, and 3. It also has length limit collars for thread gauge sizes of 3/16, ¼, 5/16,3/8, 7/16, ½, 9/16, and 5/8 in.
The company had recently purchased an automatic Rotary Thread Gage Inspection Tool from Multimatic Products. It is a portable 12-oz device ergonomically designed for repetitive industrial use, and it comes with a rechargeable lithium battery.

The tool eliminates operator hand and arm fatigue and repetitive motion injuries. The inspection supervisor decided to use the new tool for the hose end fitting inspection. Since the device is motor operated and reverses automatically, it does not necessarily require visual confirmation. Thus, one person could easily keep up with the production speeds set up by the assembly operation.
Once engaged by the operator, the device rotates the thread gage. When the thread gage moves to a predetermined set depth or length to be checked, the device flashes a green LED light and automatically reverses itself to exit the threaded hole. At the end of a complete cycle, the threaded part has passed inspection. If the cycle is not completed and the threaded part remains on the thread gage, then the part is not to specification and is rejected. The internal threads for the hose fittings are standard 9/16-18 threads of about a 0.50 in. deep.
The Rotary Thread Gage Inspection Tool lets you change to other standard or specially designed taper-lock style thread plug gages, and will adjust to various thread depths. By using the tool, the Eaton personnel were able to perform their duties 20 to 30% faster than if they had used a manual thread inspection tool. Plus, there would be fewer physical demands and possible ergonomic injuries.
Multimatic Products
www.MultimaticProducts.com
::Design World::
Filed Under: Factory automation, AUTOMATION, Gages, MECHANICAL POWER TRANSMISSION, TEST & MEASUREMENT


Tell Us What You Think!