The primary requirement for casters is being able to take rough handling without suffering structural failures. One method for caster testing is hitting the caster frame with a measured force and checking for any signs of structural damage. This test is normally performed by an operator who uses an impact tester and then visually inspects the caster for damage. This approach is expensive to perform and slows production. Manual inspection leaves open the possibility of operator error and can also miss subtle failures that are beyond the capability of the human eye.

One caster manufacturer identified a market need for a product that with 100% visual inspection. This created the challenge of developing an automated approach to impact testing and subsequent inspection. The manufacturer selected Invotec to develop the system.
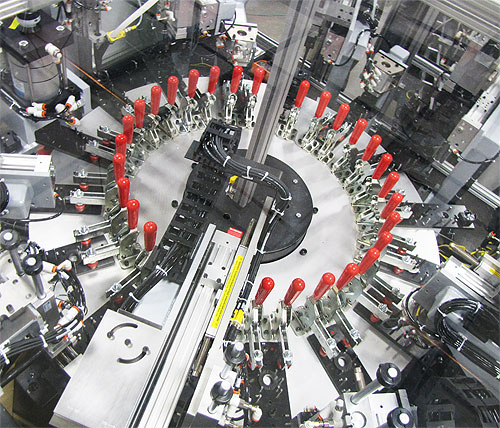
The company conceived a manufacturing system that includes a 16-station indexing dial machine that takes the components through every assembly operation plus testing and inspection. Inspection is performed first on the main frame so that molding problems can be identified before further value is added to the parts. The frame is then fed into the side of the inspection station and is loaded into a fixture in the station. A pneumatic drive lifts a weight riding above the part and then drops it onto the frame.
The frame passes the test if it sustains no visible damage. The traditional way to inspect the part would have been to have an operator manually inspect each one, but Invotec engineers set about developing a machine vision application to inspect the part.

“We looked to the customer to define and provide samples of parts that are and are not acceptable after impact testing,” said David Barton, business development manager for Invotec. “We jointly agreed on a list of defects that would constitute a failed part.”
“Our challenge was to reliably and quickly identify parts with any of the specified defects,” Barton said. “A majority of the equipment we design and build has a camera in it so we are experienced in developing machine vision applications. We most frequently work with Cognex cameras because they offer an extensive library of powerful vision tools and a graphical development environment that simplifies the task of developing even the most complicated vision applications.”
The Cognex vision tools library includes tools that can locate parts despite variations in orientation, size and appearance; 1-D and 2-D code reading tools, defect detection tools as well as many others.
Invotec engineers selected the Cognex In-Sight 5100 vision system because it met all of the requirements for the application. In-Sight vision systems provide a modular package that does not require any additional hardware. They offer a vibration resistant die-cast aluminum and stainless steel case with sealed M12 connections and a protective lens cover to provide 1P-67 protection against dust and moisture.
Invotec engineers performed a series of high force tests to create samples of failed parts for developing the vision program. They used the In-Sight Explorer spreadsheet view to configure the vision tools and handle the data created from the vision application. The spreadsheet view enables users to define the application with drag and drop vision tools and a graphics palette with menu-driven property sheets. They used a histogram tool to identify areas on the part where the light was passing through.
After inspecting the part, the vision system sends a pass/fail signal to the PLC controlling the dial machine. If the part is bad, it cycles through the rest of the stations without any further operations being performed to avoid wasting additional components. If the part is good, a small heated spherical tip applies a thermal mark that provides assurance that the part has passed impact testing. A second camera uses the PatMax pattern-matching algorithm to check for the presence of the mark. The algorithm learns an object’s geometry using a set of boundary curves that are not tied to a pixel grid, and then looks for similar shapes in the image without relying on specific gray levels.
The machine performs a variety of automated assembly operations using technology that is similar to previous caster assembly systems. The caster components are inspected and assembled using pick and place technology. Once assembled, the casters are radially riveted together and receive a measured grease application. The completed caster is then loaded in a good parts bin for shipment preparation. The new process brought the entire assembly, testing and inspection process down to a 5 sec. cycle time and two different sized casters can be produced with a short changeover.
Cognex
www.cognex.com
Filed Under: Vision • machine vision • cameras + lenses • frame grabbers • optical filters


Tell Us What You Think!