Design World

  • Home
  • Technologies
    • 3D CAD
    • Electronics • electrical
    • Fastening & Joining
    • Factory automation
    • Linear Motion
    • Motion Control
    • Test & Measurement
    • Sensors
    • Fluid power
  • Learn
    • Ebooks / Tech Tips
    • Engineering Week
    • Future of Design Engineering
    • MC² Motion Control Classrooms
    • Podcasts
    • Videos
    • Webinars
  • LEAP AWARDS
  • Leadership
    • 2022 Voting
    • 2021 Winners
  • Design Guide Library
  • Resources
    • Subscribe!
    • 3D Cad Models
      • PARTsolutions
      • TraceParts
    • Digital Issues
      • Design World
      • EE World
    • Women in Engineering
  • Supplier Listings

FOGALE’s LENSCAN Thickness, Positioning Measurement System

By Design World Staff | December 11, 2008

Share


Chicago, IL — FOGALE will present its LENSCAN system for non-contact thickness and positioning measurement at Photonics West 2009 in San Jose, Calif., from Jan. 27 to 29, on the French Pavilion at booth 1613.
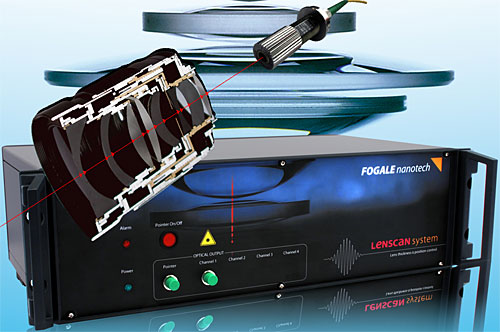
fogale-lenscan.jpg


The LENSCAN system is a non-contact thickness and positioning measurement in optical assemblies. It allows for direct measurement of the position and the center thickness of all optical elements and air gaps of an assembly along the optical axis. It works for all kinds of elements such as lenses, optical cubes and flats, and also measures distances between them (air gaps). Whether in production, quality control, or R&D mode, it can be used with large benefits in term of time saving and quality assessment at all steps of the optical design and manufacturing process.


Based on the principle of a low-coherence infrared interferometer technique, the system operates as a comparator of optical group delays. It can be used to measure positions and thicknesses of transparent materials at the near infrared wavelength.


While the standard LENSCAN system achieves an absolute accuracy of ‚±1 ‚µm for position and distance measurements, the new generation, LENSCAN +600, reaches an accuracy level of ‚±200 nm for distance measurements while maintaining the ‚±1 ‚µm for position measurements. The system, including its software, has been specifically optimized as a metrology tool dedicated to the optical industry. The focus position of the collimator is adjustable to the position of the sample. The signal treatment performs specific analysis in order to eliminate many parasitic contributions due to multiple reflections. The software allows the measurement of air gaps and lenses thicknesses inside an objective to check if the system meets the tolerance specification. The large measurement range (up to 600 mm), the long working distance (up to several meters), and the possibility to use a long measurement fiber (several tens of meters) between the system and the collimator give perfect solution for a wide range of applications.


www.fogale.fr


::Design World::


Filed Under: Test + measurement • test equipment, Vision • machine vision • cameras + lenses • frame grabbers • optical filters


Tell Us What You Think!

Related Articles Read More >

mti
Portable signal simulator works with jet engine vibration measurement/balancing systems
MTI
Portable engine balancing system for business and regional jets
moog
Test controller features compact footprint, 5 kHz loop rate
SAKOR Technologies’ new dynamometer line to meet international environmental standards

DESIGN GUIDE LIBRARY

“motion

Enews Sign Up

Motion Control Classroom

Design World Digital Edition

cover

Browse the most current issue of Design World and back issues in an easy to use high quality format. Clip, share and download with the leading design engineering magazine today.

EDABoard the Forum for Electronics

Top global problem solving EE forum covering Microcontrollers, DSP, Networking, Analog and Digital Design, RF, Power Electronics, PCB Routing and much more

EDABoard: Forum for electronics

Sponsored Content

  • Industrial disc pack couplings
  • Pushing performance: Adding functionality to terminal blocks
  • Get to Know Würth Industrial Division
  • Renishaw next-generation FORTiS™ enclosed linear encoders offer enhanced metrology and reliability for machine tools
  • WAGO’s smartDESIGNER Online Provides Seamless Progression for Projects
  • Epoxy Certified for UL 1203 Standard

Design World Podcasts

July 26, 2022
Tech Tuesdays: Sorbothane marks 40 years of shock and vibration innovation
See More >
Engineering Exchange

The Engineering Exchange is a global educational networking community for engineers.

Connect, share, and learn today »

Design World
  • Advertising
  • About us
  • Contact
  • Manage your Design World Subscription
  • Subscribe
  • Design World Digital Network
  • Engineering White Papers
  • LEAP AWARDS

Copyright © 2022 WTWH Media LLC. All Rights Reserved. The material on this site may not be reproduced, distributed, transmitted, cached or otherwise used, except with the prior written permission of WTWH Media
Privacy Policy | Advertising | About Us

Search Design World

  • Home
  • Technologies
    • 3D CAD
    • Electronics • electrical
    • Fastening & Joining
    • Factory automation
    • Linear Motion
    • Motion Control
    • Test & Measurement
    • Sensors
    • Fluid power
  • Learn
    • Ebooks / Tech Tips
    • Engineering Week
    • Future of Design Engineering
    • MC² Motion Control Classrooms
    • Podcasts
    • Videos
    • Webinars
  • LEAP AWARDS
  • Leadership
    • 2022 Voting
    • 2021 Winners
  • Design Guide Library
  • Resources
    • Subscribe!
    • 3D Cad Models
      • PARTsolutions
      • TraceParts
    • Digital Issues
      • Design World
      • EE World
    • Women in Engineering
  • Supplier Listings