Free programs that seem to behave like LabVIEW engineering software have become available. Here’s what’s behind the user interface.
Leland Teschler, Executive Editor
Since 1986, engineers working in test instrumentation have been able to use a program called LabVIEW developed by National Instruments Inc. LabVIEW is well-known for its graphical user interface which lets users program instrument functions by routing wires between blocks rather than by writing computer code. The procedures written in LabVIEW can be quite sophisticated. They can include, for example, closed-loop feedback and function nodes for controlling devices such as cameras and voltmeters.
The concept of being able to construct relatively complicated test procedures without writing a traditional text-based program is alluring. However, no open-source equivalents to LabVIEW have been developed. That may be because National Instruments has patented many of the concepts underlying LabVIEW.
Nevertheless, one open source program called MyOpenLab has some of the look and feel of LabVIEW. MyOpenLab seems to have been a home project for a programmer in Germany who first released it in 2006. It is now maintained by a programmer in Columbia. It’s following has grown thanks partly to a college professor in Spain who has posted tutorial videos and a number of short online courses that employ the program. (Another open-source program called Pylab-works has a similar look-and-feel but apparently has been abandoned.)
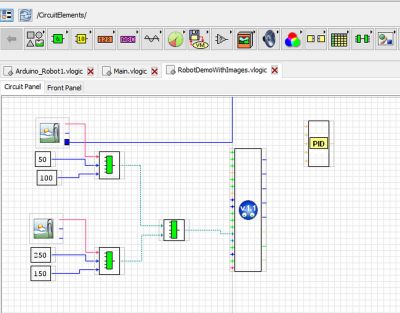
A simple MyOpenLab circuit written to execute on an Arduino. The resemblance of the graphic elements to those in the LabVIEW program are evident. And as in LabVIEW, the user runs wires between elements using the mouse. The wires appear as continuous or dotted to denote different properties.
In particular, MyOpenLab seems to be widely used to develop control programs that can run on Raspberry Pi and Arduino boards. (There is also a LabVIEW compiler available to run programs on the Raspberry Pi. LabVIEW can’t run on Arduino though it can run on a PC and tell an Arduino to perform certain operations.)
The resemblance between LabVIEW and MyOpenLab has led to questions on online forums about how the two programs really differ. The appeal of MyOpenLab is easy to understand. A basic license for a seat of LabVIEW starts at about $400 annually and goes up from there. There is a hobbyist version available called LabVIEW Home Bundle for a one-time fee of $50. But it is clearly labeled as being for “noncommercial, nonindustrial, and non-academic purposes.”
Though MyOpenLab may behave a bit like LabVIEW, it is based on Java and has an internal structure that is completely different. It is worth investigating the internal architecture of the two programs to see how they compare.
Difference between LabVIEW and MyOpenLab
LabVIEW is built using a concept called data flow programming. The formal explanation of data flow programming is that its applications consist of numerous processes that exchange data through a series of connections. An operation runs as soon as all its inputs become valid. Moreover, the processes can be reconnected to form different applications without undergoing any changes internally.
A simpler explanation is to recall the workings of the most widely used flow-based programming application: the spreadsheet. Each spreadsheet cell is a process. Connections between cells take the form of the equations and cell references within them. To reconnect the cells in a different way, the user writes different equations with different cell references.
LabVIEW can be visualized as operating in a similar way. Instead of spreadsheet cells, it uses rectangles to represent processes. Connections between processes take the form of wires. (Another widely used analogy is to view LabVIEW as working like a flow chart, again with wires forming the connections.)
The terminology for the LabVIEW programming model is more complicated than that of a spreadsheet. Whereas a spreadsheet program has individual worksheets, the roughly analogous structure in LabVIEW is a virtual instrument (VI). Each VI consists of a block diagram, a front panel and a connector panel. A VI that calls or makes use of another VI does so via the connector panel. The front panel is built using what are called controls that supply information to the VI and indicators that display results based on the inputs given to, and the internal processes of, the VI.
The block diagram contains structures and functions which perform operations on controls and supply data to indicators. Collectively controls, indicators, structures, and functions are referred to as nodes. Nodes connect to one another using wires. Thus, in a spreadsheet, a cell can be defined to display the addition of two other cells; in LabVIEW, two controls and an indicator can be wired to an addition function so the indicator displays the sum of the two controls.
The spreadsheet analogy with LabVIEW breaks down with regard to virtual instruments because a VI can not only run as a program, but it can also be dropped as a node onto a block diagram of another VI. One advantage of this approach is that each VI can be tested in a modular fashion before being embedded into a larger structure.
The simplicity of building programs by dragging and dropping VIs has benefits. But when the functions to be implemented are complex, the construction of LabVIEW programs may require an extensive knowledge of LabVIEW syntax and memory management topology.
Once the hierarchy of VIs is complete, the resulting LabVIEW code gets compiled into executable machine code.

A front panel created in MyOpenLab and the corresponding connections on the worksheet. Elements for the worksheet get selected from the library area located in the upper left of the screen.
MyOpenLab has an architecture that is not oriented around flow programming; it is what’s called event driven. In event-driven programs, events determine the flow of the program. Typical events include mouse clicks, key presses, and messages from other programs. Perhaps for obvious reasons, graphical user interfaces typically are built around event-driven architectures.
The typical approach to implementing a program that responds to events is to build in a main loop that listens for events in a way that is analogous to that of industrial programmable controllers. When the program senses an event, it runs an event handler routine. In the case of event-driven programs for GUIs, the event handlers typically look for mouse clicks and keystrokes. In the case of MyOpenLab, we might surmise event handlers look for wires pulled between blocks, inputs to block functions, and so forth.
Though MyOpenLab is built around an event-driven architecture, LabVIEW can also implement event-driven actions. It does so via an “Event” structure. Here, the structure term refers to graphical entities that control how and when code runs. In this sense, LabVIEW can be viewed as a hybrid between a data flow program and one that’s event driven.
Readers might note that the looping and event handlers in an event-driven program sound a bit like the role played by routines in flow-based programs that look for changes in inputs. The analogous function in a flow-based program is called a scheduler. The scheduler decides whether to do something with the list of connections between the blocks. An important difference between an event-based program and a data-flow program is that the scheduler in a data-flow program doesn’t do any looping. It only runs when there is data to work on and somewhere to put the output. Generally speaking, this structure lets flow-based programs consume less run time than event-based programs.
To be clear, the “looping” in this discussion takes place internally within the software. Both LabVIEW and MyOpenLab can be used to create multiple information loops, stacked sequences, and so forth. But these loops are constructed by the program user.
MyOpenLab is written in Java. Java is a compiled language. Java applications are typically compiled into bytecode that then runs via another program called a Java runtime environment. It, and another component called a Java virtual machine, typically come as part of a Java development kit. The point to note about all these Java components is that they are free, like MyOpenLab itself.
Simple vs. sublime
One reason for comparisons between LabVIEW and MyOpenLab is that the two programs have analogous functions in their user interfaces. In MyOpenLab, the drawing area is called a circuit panel. The program also has a front panel. Where LabVIEW has virtual instruments, MyOpenLab has visual models. In MyOpenLab, the user presses button icons for actions such as starting and stopping the simulation, stepping through sequences, showing data tables, adjusting simulation time, and so forth. To make connections between component blocks, the user marks the output with a click of the left button and then marks the corresponding entry of the selected component block.
Because MyOpenLab is in Java, it’s possible to modify the Java code of a component. It is not clear from its documentation whether MyOpenLab can accept or work with routines written in languages other than Java. In contrast, LabVIEW can call and execute code from several languages as well as DLLs.
The means of running code written outside the main application illustrate the differences between LabVIEW and MyOpenLab. LabVIEW is a more complete and mature program. One indication: The manual detailing just how to use external code in LabVIEW runs 302 pages. Documentation for MyOpenLab consists mainly of 10 user guides each on the order of 60 pages long and written in Spanish. (Google translate seems to do a decent job of translating these into understandable English.)
That said, LabVIEW programs can grow to become quite complex if the task at hand is complicated. And the creation of sophisticated LabVIEW programs seems to require as much expertise on the part of the programmer as any other advanced language.
Consider, for example, comments on the LabVIEW Wikipedia talk page where Wikipedians discuss edits to the article at hand. The talk page for LabVIEW has a lengthy section on criticisms of LabVIEW and whether specific criticisms should be included in the LabVIEW Wikipedia article. Many of the criticisms take the form of, “You can’t do X in LabVIEW,” and are written by practitioners who have a substantial history with the program. As often as not, other practitioners chime in pointing out that LabVIEW can indeed do X. But the how-to explanation is either buried in the rather extensive LabVIEW documentation or is laid out in terms that aren’t exactly clear.
Of course, MyOpenLab doesn’t incorporate any of the advanced programming features about which some Wikipedians griping on the LabVIEW talk page seem unaware. Thus the clearest delineation between where each of the two programs fit is in the difficulty of the application. LabVIEW will continue to make sense for handling knotty instrumentation and control tasks. MyOpenLab could be a candidate for simpler uses. DW
References
We are indebted to Rich Brueggman, Certified LabVIEW expert and founder/CEO of Data Science Automation in Pittsburgh, Pa., for his suggestions and sanity checks during the writing of this piece. www.dsautomation.com, 724-942-6330.
You may also like:


Filed Under: Data acquisition + DAQ modules, Software • simulation, MOTION CONTROL, TEST & MEASUREMENT, Motion control • motor controls, Mechatronics